Accelerating CI – Part 3: Incremental CI

In my previous blog posts, I explained how parallelization and resource allocation optimization help developers accelerate their CI workflows. Today, I would like to introduce you to another method of optimizing software development processes, which I call “incremental CI”. As its name suggests, it relies on analyzing the source code differences between two versions.

Incremental processing

Nowadays, in order to further increase their productivity, developers include tasks other than builds and tests in their CI workflows. The most common examples are the tools to check code styles for adherence to coding standards and to measure code metrics. Some of these tools, such as gofmt and golint, are designed to process only the files that are passed as inputs and are not affected by any changes in other files. In the case of those tools, the results about input files with no changes are always exactly the same, no matter how many times they are executed. By reusing the result of the previous execution, Inspecode brings a significant performance gain.
To enable this behavior in Inspecode, you should set the value of the incremental parameter to true, as shown in the below example:

inspecode:
    experimental:
        incremental: true

It is important to note that, with Inspecode, incremental processing can also be enabled or disabled on a tool-by-tool basis. In the example below, incremental processing is enabled on gofmt and disabled on golint.

inspecode:
    experimental:
        incremental: true
    gofmt: default
    golint:
        experimental:
            incremental: false

It is also important to note that there are several cases that might cause different results, even if the input source files are not modified:

  • Changes are made in the tool’s option settings
  • The tool’s configuration file is updated
  • The tool is upgraded to a newer version

To avoid any issues in the above scenarios, we take a conservative approach, where the tools are set to process all the input files, no matter if these were updated or not.

Automatic task skipping

Automatic task skipping greatly increases the speed of CI workflows. If incremental processing is enabled and Inspecode does not detect any change on all the target files of a tool, the execution task of the tool will be automatically skipped. You don’t need to write special words like [ci skip] in commit messages. For example, if the all the updates exclusively concern the README file, while the Go source code files are untouched, the execution of golint is skipped. Inspecode reports the same golint issues as detected in the previous task. Hence, the status of the skipped task also remains unchanged from the previous task.

Similarly, if the input and ignore clauses in rocro.yml includes no target files, Inspecode will skip the execution of the tool automatically. The below snippet illustrates a case where all the target files for golint are ignored:

inspecode:
    experimental:
        ignore: "**/*.go"
    golint: default

In the above example, the task execution is skipped regardless of whether incremental processing is enabled or disabled. The status of the task will always be Skipped. You should review the input and ignore settings if the task status is Skipped, although you did not cancel the job including the task.

This blog post introduced you to incremental processing, one of the methods Inspecode uses to help developers speed up their CI workflows. Currently, Inspecode analyses file changes and conservatively decides if incremental processing can be executed so that all the issue reports of tools never change. In the future, we are thinking about making incremental processing the default option. I hope this blog post included useful information that will help you further optimize your CI workflows.

How to Use Input Filters in Inspecode

I’m Kenji Hanakawa from Rocro and I’d like to introduce you to one of the most useful features of Inspecode – input filters. First, let me explain what input filters are. By default, Rocro processes all the source code files found in a GitHub or BitBucket repository, including those located in subdirectories.
However, in some cases, you might want to avoid this behavior. For example, if your application uses a third-party library, its source code doesn’t need to be processed. Here is exactly where input filters come to help. With input filters, developers can easily specify which files and directories should be processed and which files and directories should be ignored.

How to Set-up the Input Filters

Rocro provides two directives that you can use in order to set-up input filters in the rocro.yml configuration file:

  • input : a file or directory included in an input directive is going to be processed.
  • ignore : conversely, a file or directory included in an ignore directive will be excluded from processing.

The syntax follows the .dockerignore format which extends UNIX glob patterns. Let’s see how it actually works:

inspecode:
    gofmt:
        input: mycode # Process mycode file/directory located in the root directory.
        ignore: mycode/sample* #Do not process files and directories starting with sample and located in the mycode directory.

Note that, if input directive is missing, Rocro will process all files and directories, except those that match the ignore directive. It is important to mention that multiple patterns can be mixed:

inspecode:
    gofmt:
        ignore:
            - sample* # Do not process files and directories starting with sample and located in the root directory.
            - example* # Do not process files and directories starting with example and located in the root directory.

How to Use Wildcards

To provide maximum flexibility, Inspecode was engineered to offer support for wildcards. For example, you could use the * wildcard to refer to a hierarchical directory tree:

inspecode:
    gofmt:
        ignore: */*/sample* # Do not process files and directories starting with sample and located in all directories in the second level.

Another useful pattern is **. It matches any directory structure:

inspecode:
    gofmt:
        ignore: **/sample* # Do not process files and directories starting with sample, no matter the location.

Besides ignore, developers can use ! to specify files and directories they want to exclude from processing. Basically, ignore and ! have the same effect.
Here is how our first example can be written using ! instead of ignore:

inspecode:
    gofmt:
        input:
            - mycode # process the files under the mycode directory located in the root directory.
            - !mycode/sample* # Do not process files and directories starting with sample and located in the mycode directory.

Note that, even if ! and ignore can be used simultaneously in the same configuration file, it is quite complicated to do it. Also, the behavior is difficult to understand for most people. To keep your code easy to read and maintain, we advise you to avoid the use of ! within an input clause.

How to Set-up Global Input Filters

Input filters can be applied at the global level too. By doing so, you will configure a set of rules that apply to all tools. Here is an example of how input settings can be applied at the global level:

inspecode:
    experimental:
        input: mycode # Applies to all tools. Process only the mycode file/directory in the root directory.
        ignore: **/sample* # Applies to all tools. Do not process files and directories starting with sample and located in the mycode directory.

Furthermore, it is possible to use both global settings and tool specific settings at the same time. In this scenario, the tool settings are going to be added to the global settings.
This approach is useful when you need apply several general settings to all tools and then further customize them as needed.
Let’s say you need to exclude from processing all directories starting with sample. Additionally, gofmt should ignore all files located in directories starting with gosample. Here is how you can do it:

inspecode:
    experimental:
        input: mycode # We will process only the mycode file/directory, located in the root. It applies to all tools.
        ignore: **/sample* # Do not process files and directories starting with sample and located in the mycode directory. It applies to all tools.
    gofmt:
        input: **/gocode # Process only the gocode files and directories located in mycode directory. It only applies to gofmt.
        ignore: **/gosample* # Do not process files and directories starting with gosample. It only applies to gofmt.

By using both global level filters and tool level ones, you can build sophisticated and easy to understand configuration rules with just a few lines.

How to Prevent Secrets in Source Code with Inspecode

In the last couple of years, several articles described incidents in which malicious individuals stole API keys committed to public source code repositories such as GitHub and BitBucket. These individuals usually misuse the service in order to execute computing jobs for their own profit. As a result, the victims often received bills up to several thousand dollars.

To avoid this problem, people often rely on tools such as git-secrets. Once installed, the tool will scan each commit to prevent you from adding secrets to your repositories. While useful, git-secrets has an important downside—it requires to be installed and set-up individually on each developer’s machine. Also, several GUI based git clients are not configured to reflect the changes by default. Thus, to make it work, one needs to configure both the git-secrets and the GUI based git client. With large teams, the chances of misconfigurations are increased.

CI-compliant alternative: Inspecode grep

Fortunately, we’ve got you covered. Inspecode grep is a better alternative, able to make your CI builds fail each time a regular expression pattern indicates that the source code contains authentication information.

Let’s see how to configure and use it through the case of AWS keys. To detect keys in source code, add the following settings to your rocro.yml file.

inspecode:
  grep:
  - options:
      --extended-regexp:
      -I:
      --regexp:
        - AKIA[A-Z0-9]{16}
        - ("|')?(AWS|aws|Aws)?_?(SECRET|secret|Secret)?_?(ACCESS|access|Access)?_?(KEY|key|Key)("|')?\s*(:|=>|=)\s*("|')?[A-Za-z0-9/\+=]{40}("|')?
      --word-regexp:
    thresholds:
      num-issues: 0

These regexp patterns and grep options are based on the ones used in git-secrets. You can customize these patterns and options. See our help page.

In order to test if it is properly configured, commit and push a file with the below content:

#!/bin/sh
aws_key="AKIAAKIAAKIAAKIAAKIA"
echo "${aws_key}"
aws_secret_key="XXXXXXXXXXXXXXXXXXXXXXXXXXXXXXXXXXXXXXXX"
echo "${aws_secret_key}"

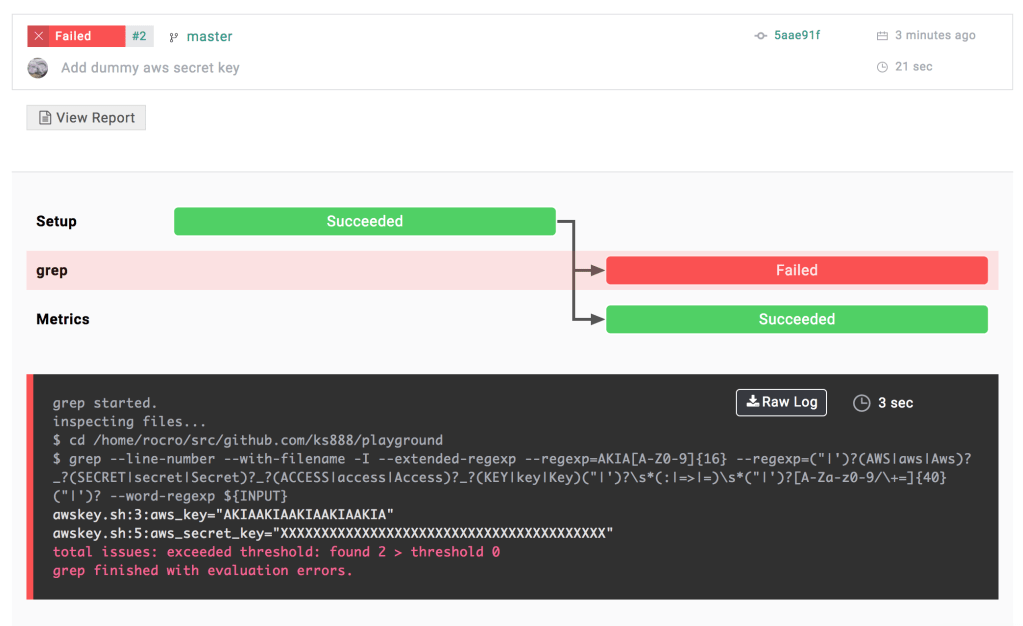
Now, execute the CI job. If everything works as expected, the keys should have been detected and the job should have failed:

Screen Shot 2018-05-18 at 18.55.06

What if the secret key for testing is reported as an issue?

When testing, it is possible that the code used for said purpose matches the specified pattern but it is not a valid key. So, even if this gets reported by Inspecode grep as an issue, it should be considered a false positive.

To handle this scenario, Inspecode lets you specify a threshold through the num-issues parameter of the rocro.yml file. In the above example, the value is set to 0, which means that a single match will make the job fail. To overcome the issue, just increment the num-issues when a job fails due to a false-positive.

Conclusion

Individual solutions aimed to protect developers from secret-key leaks do have important limitations that are more prevalent when many developers are working together. The method presented in this blog post uses Inspecode’s grep and brings an important advantage—it is not dependent on individual development environments. You just have to configure it once and the same settings will be applied to the whole team. It is strong, easy, and especially effective when used by large teams of developers.

Thresholds for the Number of Issues

The aim of this blog post is to help developers recognize when Inspecode detects problems in their code and also show them how to customize the default settings.

As you probably remember from our previous posts, Inspecode uses the following terminology:

  • A job is comprised of several processes. These processes are triggered by various events such as Git push or pull requests. For example, the entire process described in YAML is considered a job.
  • A  task is a set of processes executed in individual containers. For example, the execution of each tool is a task. Thus, a job usually contains several tasks.

For each completed task or job, Inspecode assigns a status that you can check to find out if a particular job or task was executed successfully or if it failed. It is important to note that, when the default settings are used, the status of an executed job does not depend on the number of issues detected in your code. Hence, to find out if an issue was detected in the code,  a developer should either check the report or the console log.

How to Configure Job Status Using Thresholds

Fortunately, there is an easier way to spot issues. Inspecode can be configured to automatically set the job status to Failed if the number of issues exceeds a certain threshold. The example below shows how to configure rocro.yml in order to set the status to Failed if the number of issues for the job is greater than 10:

inspecode:
  thresholds:
    num-issues: 10 # Allow up to 10 Issues for the entire job

As you guessed, with these settings, the job status will be set to Failed if more than 10 issues are found. So, when the job status is set to Failed, developers should fix the issues in their code.

Inspecode also lets developers set a threshold at the task level. When the threshold is set at the task level, the status of the job will be set to Failed if any of its tasks will fail. Here is how to configure rocro.yml in order to set a threshold at the task level:

inspecode:
  rubocop:
    thresholds:
      num-issues: 5 # Allow up to 5 Issues of RuboCop
  misspell:
    thresholds:
      num-issues: 10 # Accept Issue of misspelling with 10 tickets

Inspecode was engineered to allow the highest level of customization. Hence, job level thresholds and task level threshold can be mixed. Below you can find an example:

inspecode:
  thresholds:
    num-issues: 10 # Allow up to 10 Issues in the entire job
  rubocop:
    thresholds:
      num-issues: 5 # Allow up to 5 Issues of RuboCop
  misspell:
    thresholds:
      num-issues: 10 # Accept Issue of misspelling with 10 tickets

Configuring Job Status Using Severity Levels

With Inspecode, developers can set the thresholds with even more granularity. For example, a threshold can be set for the number of issues that have a level of severity greater or equal with the one specified. As you already know, Rocro uses four different severity levels:  Info, Warning, Error, and CriticalLet’s have a look at another example:

inspecode:
  rubocop:
    thresholds:
      num-issues:
        total: 10
        warning: 8
        critical: 0

This snippet will set the status to Failed if any of these conditions are met:

  • The total number of issues is greater than 10 or
  • More than 8 issues with warning, error, or critical security level are detected or
  • One or more critical issues are detected

Additional Severity Levels

Not all tools provide the same severity levels. For example, RuboCop supports additional severity levels such as Fatal, Refactor, Convention. Inspecode also allows to set thresholds for those additional severity levels. Here is an example config specifying additional severity levels:

inspecode:
  rubocop:
    thresholds:
      num-issues:
        error: 5
        fatal: 3
        refactor: 10
        convention: 10

To help developers spot any issue with ease, Inspecode maps those external severity levels to the built-in ones. For example, Rubocop’s Fatal is equivalent to Critical while Refactor and Convention are equivalent to Info.

We encourage you to check the documentation for each tool to find out more details about its severity levels.

Conclusion

As we have seen, Inspecode was designed to provide the highest amount of flexibility. By allowing developers to set the threshold levels as shown in this blog post, it is always easy to spot any issue introduced with the latest code change.

Pricing for Inspecode and Docstand

Hello everyone. Today, we would like to explain the pricing structure for our upcoming releases of Inspecode and Docstand. These new releases of both products are planned for the end of May later this year*.

At Rocro, we want to offer you, our user, what we consider to be a fair and simple pricing structure. As such, you will be charged for the number of CPU cores that you sign up for in your contract. You can configure your cores to run in parallel, which will make your jobs run faster.

Initially, we will offer Free and Professional plans for both products. The details of these plans are shown in the pricing pages of Inspecode and Docstand.

As shown in the chart, if you use either product with only one core, there is no charge. Under this Free plan you will be allocated 1500 minutes per month. When we initially go live, we will offer a promotion giving you unlimited running time.

To use either product with more than one core, purchase the Professional plan. Each core will cost $50 per month.

How many cores do you need? It’s your decision, but here are some guidelines: For a ten person team using Inspecode, we recommend using eight cores. This is the number of cores that is currently available to beta users. For a five person team, we recommend four cores.

For Docstand, we recommend two cores for most cases, even for a ten person team.

This pricing structure is deeply connected to the nature of our services. Inspecode and Docstand execute jobs in parallel automatically. You can control performance by adjusting the number of CPU cores. More cores, faster results. Regardless of team size. As explained in the previous blog post, you can even optimize CPU resource allocation manually.

If you are an existing beta user of Inspecode or Docstand, you will automatically be migrated to the Free plan when the new release starts.

The Free and Professional plans can both be used for personal or business purposes.

If you have any questions about our pricing plans, reach out to us at support@rocro.com.

* Seeing that the user registration rate increased more than three times since Rocro announced the new free and professional plans, we decided to extend the current free offering for a few months. The free offering includes 8 CPU cores. (Updated May 30th, 2018.)

Accelerating CI – Part 2: Optimization of resource allocation

In the previous blog, I focused on accelerating CI by parallelization. However, since there is a limit to the hardware resources because of their costs, therefore efficient distribution of the limited resources to parallel tasks is the key to further speeding up. In this blog, I will show you how to improve job throughput by optimizing the allocation of CPU usage.

In Rocro, a series of processes caused by events such as git-push and pull requests are called jobs and processes executed on individual containers in jobs are called tasks. In other words, a job is a collection of tasks. For example, in the following rocro.yml, the entire process set in YAML is a job and the process of each tool (such as gofmt), setup process for executing these tools, etc. are tasks.

inspecode:
    gofmt: default
    golint: default
    go-test: default

Since the execution time of a job depends on the slowest task, in order to improve the throughput of the job, it is necessary to level the execution time of each task as much as possible. For Inspecode/Docstand, CPU usage can be specified by cpu option in rocro.yml. cpu: 1 indicates that the tool can use one CPU core to its full extent. With cpu: 1, 3.75 GiB memory is allocated and the allocation is proportional to the CPU usage. You can specify the amount in 1/1000th units by specifying the usage amount with a decimal fraction such as cpu: 0.25 or by adding m (milli) at the end. cpu: 250m is equivalent to cpu: 0.25.

If go-test takes the longest time in the above rocro.yml, assigning more CPU resources to go-test than the other tools will improve the processing time of the whole job:

inspecode:
    gofmt:
        machine:
            cpu: 0.25
    golint:
        machine:
            cpu: 500m
    go-test:
        machine:
            cpu: 1.25

This level of finer optimization of CPU resources is not available in other CI tools and services. Inspecode/Docstand are completely free during the beta period and you can use a total of 8 CPU cores for free. So I hope you can try out various optimizations.

Accelerating CI – Part 1: Parallelization

Hello everyone, I am the CTO of Rocro Inc. Today, I will start the Rocro Engineering Blog. In this blog, we hope to convey not only about our products but also the various know-how gained through the product development.

Rocro is a group of web services for software developers using GitHub and Bitbucket. Amidst many excellent services already available in the market, why did I started this Rocro project? One of the reasons is to further accelerate CI. With many-core processors and auto-scalable cloud services becoming more and more popular, the best way to accelerate CI is by dividing jobs as finely as possible and parallelizing them. In this part, I will explain about how Rocro supports parallelization.

Rocro’s Inspecode/Docstand executes all tools in parallel*1. For example, if you write rocro.yml like the following in Inspecode, the three tools (gofmt, glint, go test) will run in parallel.

inspecode:
    gofmt: default
    golint: default
    go-test: default

In this way, you can parallelize the execution of tools just by arranging the tool names. Even without rocro.yml, Inspecode will detect the major language in the Git repository and automatically execute the appropriate tools in parallel.

It is also possible to split the input given to the tool for further parallelization. For example, by writing the following rocro.yml, the input of go test is split into two and executed in parallel.

inspecode:
    gofmt: default
    golint: default
    go-test:
        - input:
            - /path/to/package1
            - /path/to/package2
        - input:
            - /path/to/package3
            - /path/to/package4

If the execution time of a specific tool is dominant over the time of the entire job, then it is not so fast with the tool level parallelization alone. In such a case, it is better to split the tool input in appropriate way to accelerate the execution.

In the next part, I will talk about accelerating CI by optimizing resource allocation.

*1 In order to perform automatic optimization and parallelization, rocro.yml adopts declarative description style as much as possible.